vSphere 7: What’s new

Lifecycle Management and Scaling

vCenter Server Profiles:

  • vc profiles

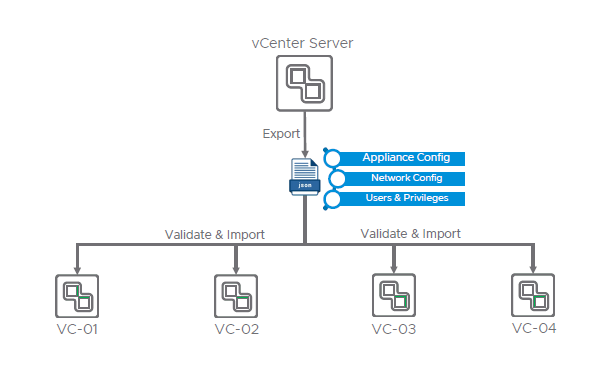
This should not be confused with host profiles.  Think of it as a way to provide a desired state across all of your vCenter Servers in your organization for instance configuring authentication or backups, as well reverting back to a last known good configuration.


  • Annotation 2020-03-07 104937

This capability is based off of just the REST API. There is no UI for this.  You capture the state of an existing vCenter Server by exporting the config in JSON format.

  • Annotation 2020-03-07 105348.png

You can then make changes to this config, think about this along the lines of mostly anything you can change in the VAMI interfaces.  You can also easily find API’s for vCenter Server configuration by executing GET or POST commands directly from in the vSphere Client! (Behind the scenes, the vCenter Server profiles is also known as infrastructure profiles. So you’ll see infra profiles in the name of the API)Annotation 2020-03-07 105226.png

Finally you then validate and import the config to other vCenter Servers.

Continue reading

Cross vCenter vMotion Utility Fling

I do not think that enough people are aware of this Fling, and that is really unfortunate.

First I want to take a step back and provide some history as to how this came about.  As most of you know, there is no easy way to live migrate a VM between different vCenter Servers that are not in Enhanced linked mode, which connects multiple vCenter Server systems together by using one or more Platform Services Controllers.

Some methods I have used in the past:

  • Host migration to target vCenter Server:
    • Remove the managed ESXi host from the source vCenter and add it to the target vCenter and then perform a regular vMotion.  This method, however, comes with a lot of caveats for instance in order to remove the ESXi hosts all the ports groups needs to be on Standard Switches so this requires a migration from VDS to VSS. Additional information available here
  • Enhanced linked mode
    • Setup enhanced linked mode between vCenter servers and perform a vMotion or Storage vMotion between the vCenter Servers, but this solution is not ideal when the source vCenter Server will get decommissioned. There is a way using supported workflows to remove ELM but is not supported by VMware so there is that! Good article by William about splitting vCenter Servers in ELM here.
  • Hybrid Cloud Extention (HCX)
    • HCX is another option that I am very excited about trying in near future which provides vMotion, Bulk Migration, WAN optimization and automated VPN with Strong Encryption.  I have tested the tool for migration between on-prem and VMC on AWS and all I can say it is a game changer. Some more on that later in the year…

So getting back to why we are here!  With not having the ability to vMotion between 2 non-ELM vCenter Servers, William Lam took it upon himself to write a script using the vSphere API with PowerCLI that finally provides the sorely missed capability to vMotion a VM between 2 vCenter Servers that are in different domains! So naturally, the evolution of making the script easier to consume is to provide a nice looking GUI with a  fling!

Here you can find the Fling written by Vishal Gupta and William Lam. Props to both for all the time and effort to provide such a value-added feature.

Update 05.07.18:  

Version 2.0 has been released which brings some great new enhancements, especially the top 3 listed below.

  • Added support to select individual host as the placement target
  • Added support for migrating VMs with shared datastore
  • Added clone functionality in addition to relocate
  • Added resource summary details for placement targets
  • Added a prompt to verify site thumbprint during SSL verification
  • Added a link to refresh VM list in the inventory view
  • Updated REST APIs to add operation type parameter

To run the fling you need => vCenter Server 6.0 and => Java Runtime 1.8.

To start the fling open a command prompt and type the following:

  • # java -jar xvm-2.0.jar
    • this will start the fling on port 8080 on the localhost.
    • If you want to change the port because it is in use, add the following flag:
      • -Dserver.port=8800
  • Connect to your localhost with port specified
  • Screen Shot 2018-05-10 at 3.44.19 PM.png
  • Select the Register tab and register to your source and target vCenters servers.
  • Screen Shot 2018-05-10 at 3.45.10 PM.png
  • Select the Migration tab, provide information start the migration.
  • Watch the magic happen…

Links:

Upgrade your vCenter 6.5 HA environment

As discussed in my previous post here, you can easily setup vCenter HA to provide a decent (not the best and hopefully this will improve) RTO of around 4 minutes for a fail over of your vCenter server.

So now that you have vCenter HA configure, how do you patch or upgrade this environment.  In a single vCenter Server instance the upgrade is really straight forward.

  • Login to the VAMI
  • Before starting the upgrade, take a File based Backup of the vCSA, using the backup utility in the VAMI.
  • Select Update
  • Select Check Updates -> Check Repository (if you have internet access)
    • Otherwise download the software and mount the ISO to the CD/DVD drive.
  • View Available Updates
  • Screen Shot 2017-10-10 at 10.30.25 AM.png
  • Select Install Updates -> Install All Updates


For a vCenter HA the steps are bit more complicate since we will use the software-packages utility from the appliance shell which requires us to SSH into the three nodes in a sequence and use manual failover so that we always patch the non-active node.  Below are my quick step by step notes for the upgrade process:

  • There are multiple ways to use the software-package utility:
    • Use the default repository
    • Use a local repository by attaching the ISO to the vCenter Server appliance.
    • Use a remote repository by using a custom repository URL that points to a local webserver in your environment to retrieve the file.
  • In my case I downloaded the vCenter Server Appliance patch ISO from “https://my.vmware.com/group/vmware/patch” and attached the file to the CD/DVD drive of the vCSA.
  • Before I start the upgrade I perform the following tasks:
    • Put the vCenter HA cluster in maintenance mode
    • Make sure SSH is enabled in the vCSA VAMI
    • For each node, I open the console and mount the patch ISO to the CD/DVD drive.
    • Take a File based Backup of the vCSA, using the backup utility in the VAMI.
  • Run the upgrade first on the Witness Node
    • First off SSH into the active vCSA node
      • From the active vCSA node, SSH into the witness node and make sure you are in the appliance shell by running:
        • “appliancesh”
        • Run: “software-packages install –iso”
        • Press Enter way to many times
          • Type yes and press Enter
        • When upgrade is completed, reboot the server
          • “shutdown reboot -r patching”
        • Exit the SSH session
  • Now run the upgrade on the Passive Node
    • First off SSH into the active vCSA node
      • From the active vCSA node, SSH into the passive node and make sure you are in the appliance shell by running:
        • “appliancesh”
        • Run: “software-packages install –iso”
        • Press Enter way to many times
          • Type yes and press Enter
        • When upgrade is completed, reboot the server
          • “shutdown reboot -r patching”
        • Exit the SSH session
  • Log out of the active vCSA node
  • Wait for the nodes to shows status up after reboot.
  • Initiate a vCenter HA failover manually
    • Login to Web client
    • Select the vCenter server -> Configure -> Settings -> vCenter HA
    • Click Initiate failover
    • Click Yes to start the failover
      • Make sure to select performing synchronization first
  • Now lastly run the upgrade on the new Passive Node
    • First off SSH into the new active vCSA node
      • From the active vCSA node, SSH into the passive node and make sure you are in the appliance shell by running:
        • “appliancesh”
        • Run: “software-packages install –iso”
        • Press Enter way to many times
          • Type yes and press Enter
        • When upgrade is completed, reboot the server
          • “shutdown reboot -r patching”
        • Exit the SSH session
  • Optional: Perform another vCenter HA failover manually back to the original vCSA node.
  • Exit vCenter HA maintenance mode
    • Login to Web client
    • Select the vCenter server -> Configure -> Settings -> vCenter HA
    • Click Edit
    • Select “Enable vCenter HA”
    • click OK

Patching of all the vCenter HA nodes should now be completed.

Food for though: This process is quite involved and I wonder, depending on company policy, would it not be easier to just remove vCenter HA, upgrade the single vCSA node through the VAMI and then configure vCenter HA again? It takes way less time and much simpler process. Let me know what you think.


Installing your vCenter Server 6.5 HA environment

vSphere 6.5 finally brought us vCenter High Availability which provides failover/RTO such that users can continue with their work in around 2 minutes through
API clients and in my observations around 5ish minutes through UI clients, awesome right!

vCenter HA is really simple to configure through the Wizard with a basic and advanced option, with the following requirements:

  • vCenter Server 6.5 Appliance with internal or external PSC
  • vCenter Server 6.5 Appliance with no snapshot and CD/DVD drive set to Client Device.
  • Cluster with at least 3 ESXi hosts that this vCSA is both managing and running on will provide Basic installation option
  • If your vCSA is managed by another vCenter Server that is not part of the same SSO domain, or running on a host that is does not manage, you will have to use the Advanced installation option.
  • A port group on ESXi for the private HA network. Optionally, you can have a dedicated vSwitch if network isolation is a requirement.
    • The HA private network must reside on a different subnet than what is used for management.
  • Network latency on the HA network must be less than 10ms.
  • No gateway for the HA network must be specified when configuring the nodes manually during advanced installations.
  • Storage:
    • Datastores for peer and witness cannot resides in a storage cluster.
    • Will get warning if you put nodes in same datastore

When vCenter HA is enabled, a three-node vCenter Server cluster (Active, Passive, and Witness nodes) is deployed, which consists of one IP address for management and three private IP addresses for the HA nodes.

  1. Open vCenter Server 6.5 web client (HTML5 client does not yet support vCenter HA).
  2. Select the vCenter server in Navigator
  3. Select Configuration -> Settings -> vCenter HA
  4. Screen Shot 2017-10-26 at 9.30.46 AM.png
  5. Click Configure

Continue reading

vCenter Server Web Client crash with latest Flash 27.0.0.170

Within the last couple of days Google ran an automatic update of Flash, which is causing havoc in the all-things-flash world.

Since Google manages the upgrade of the flash you are kind of at their mercy on this one, until all applications finally learn to stay as far away from flash as possible! Can only hope!

You can however disable the automatic update feature for flash by setting the registry HKLM\SOFTWARE\Policies\Google\Update\AutoUpdateCheckPeriodMinutes to 0.

My fix was pretty straight forward and I only had to delete the latest release folder from the path “%LocalAppData%\Google\Chrome\User Data\PepperFlash” (windows) or “~/Library/Application Support/Google/Chrome/PepperFlash” (MAC).

In my case the older version was still available in the same folder so I only had to delete the latest and restart google but if do not have the older version you can download it here.

From other users responses it seems that the version 27.0.0.130 and older still works but newer version will crash on both your Google Chrome and Firefox browsers.

Update:  VMware has release a KB here


Migration of vCenter Server using VMware Migration Assistant

The migration assistant can tackle a couple of different vCenter Server configurations:

  • vCenter Server 5.5 or 6.0 with an embedded vCenter Single Sign-On instance on Windows
  • vCenter Server 5.5 instance on Windows with external SSO
  • vCenter server 6.0 instance on Windows with external PSC

Depending on your current configuration, the migration process will change based using an internal or external SSO/PSC and where VUM is installed.

  • If VUM is installed on a separate Windows server, other that your Windows vCenter Server instance then you MUST to run the migration assistant on this server FIRST!  The VMware Migration Assistant facilitates the migration of the Update Manager server and database to the vCenter Server Appliance 6.5.
  • If embedded SSO/PSC, then you run the Migration Assistant on the source vCenter Server
  • If external SSO/PSC, then you run the Migration Assistant on the source SSO/PSC first and then run the Migration Assistant on the source vCenter Server
    • During the migration process, make sure to leave the migration windows open

You run the VMware Migration Assistant on your source vCenter Server, SSO/PSC or VUM it will perform the following tasks:

  • Discover the source deployment type.
  • Run pre-checks on the source.
  • Report errors that must be addressed before starting the migration.
  • Provide information for the next steps in the migration process.

Here are my step by step instructions for vCenter Server 5.5 with embedded SSO, no VUM:

  1. Download and Mount the vCenter Server Appliance Installer ISO file to the Windows vCenter Server.
  2. Start the migration assistant on the source, depending on your environment configuration
    1. Open the installer folder on CD/DVD drive and copy the  “migration-assistant” folder to your source windows server running the vCenter Server
    2. Open the copied folder on local drive and run “VMware-migration-assistant.exe”
      1. This will run the pre-update checklist and prompt if anything needs to be fixed.
      2. Make sure this window stays open during the whole migration process until completion.
  3. Launch vCenter server appliance UI installer
    1. Click Migrate
    2. Click Next on Introduction
    3. Accept EULA and click Next
    4. Connect to the source server
      1. Enter Windows server FQDN or IP address
      2. Enter migration assistant port number
        • If you are changing networks and have a firewall in place then pick a port that is open and available.
      3. SSO username
        • administrator@vsphere.local
      4. SSO Password
      5. Click Next
    5. Accept Thumbprint
    6. Appliance deployment target
      1. Enter ESXi or vCenter Server name for targer
      2. HTTPS port
      3. Username
      4. Password
      5. Click Next
    7. Accept Thumbprint
    8. Select Folder to place the new vCSA
    9. Select the compute resource
    10. Target appliance VM
      1. Enter VM name
      2. Enter new root password
    11. Select deployment size
    12. Select datastore
    13. Configure the temporary network identity which is used to copy the data, this will be removed after migration is completed since the target vCSA server will get the network identity of the source vCenter server.
      1. Pick network port group
      2. Enter temp IP address
      3. Enter subnet
      4. Enter GW
      5. Enter DNS servers
      6. Click Next
    14. Verify detailed entered are correct!
    15. Click Finish
    16. Wait for the migration to complete.
      • If the migration fails for any reason your can easily roll back by powering off the target vCSA and then just power on the source vCenter Server and its components.
  4. Now for stage two, which copies the data from the source vCenter to new vCSCA.
    1. On Introduction click next
    2. Connect to Source vCenter should complete automatically
    3. Join AD
      • Add username and password for user that can add computer to domain
    4. Select the best migration data options with the following 3 being available. (pretty cool that it provides the size of the migration for each option as well)
      • Just the configuration
      • Configuration, Events and Tasks
      • Configuration, Events, Tasks and Performance metrics
    5. Select if you want to join CEIP and click Next
    6. Review your settings, check the box to verify you have a backup of the vCenter server as well as the database.  Click Next
    7. Click OK on prompt that warns you that the source vCenter Server will be shut down once the network configuration is enabled.
    8. Wait for the data migration to complete.

When successful, your source vCenter Server should now be shut down and brand new shiny vCenter Server appliance should be started in its place. The best part of all you are also upgraded to vCenter Server 6.5! awesome.


vCenter Server 6.5 error: Cannot start content-library service

I recently discovered a problem with my vCenter Server after an upgrade from 6.0 to 6.5 of the vCenter Server Appliance, which runs in linked mode.

When I tried to take a backup of the vCenter Server through the VAMI I got an error “Invalid vCenter Server Status: All required services are not up! Stopped services: ‘content-library’.

Troubleshooting:

My first attempt was trying to start the service

  • I logged into the vCenter Server web client and went to administration -> Deployment -> System Configuration.
  • Double click on the the vCSA node
  • Select services
  • Select Content Library service, which under summary showed stopped.
  • Click in Actions -> Starts
  • Service failed to start with very cryptic error “An error occurred while starting service ‘%(0)s”

I also ssh into the vCSA and tried to start the service, and see the following error when trying to start the service:

Error executing start on service content-library. Details {
“resolution”: null,
“detail”: [
{
“args”: [
“content-library”
],
“id”: “install.ciscommon.service.failstart”,
“localized”: “An error occurred while starting service ‘content-library'”,
“translatable”: “An error occurred while starting service ‘%(0)s'”
}
],
“componentKey”: null,
“problemId”: null
}
Service-control failed. Error {
“resolution”: null,
“detail”: [
{
“args”: [
“content-library”
],
“id”: “install.ciscommon.service.failstart”,
“localized”: “An error occurred while starting service ‘content-library'”,
“translatable”: “An error occurred while starting service ‘%(0)s'”
}
],
“componentKey”: null,
“problemId”: null
}

Since the error message did not help much I went to search on VMware community and found other users having issues with creating content libraries after upgrade and VMware support pointed them to a KB article.

The fix:

The solution comes from KB 2151085 , however I am on version 6.5 not 6.5U1, as well as the OVF stuff was not applicable to my particular situation but the steps provided did resolve my problem and I was able to start the content-libary services.

I compared the files with a vCenter 6.5 environment that is working and found that the ts-config.properties file had the owner and group set to root:root and should be set to content-library:cis.  This is an easy fix and also solved the problem for me.   “chown content-library:cis ts-config.properties”


VMware did not disappoint! Finally NSX supports vSphere 6.5 and then some…

Yesterday VMware released both NSX for vSphere 6.3.o as well as the accompanying  vCenter 6.5a and ESXi 6.5a.

Before upgrading your NSX environment to 6.3 you would need to upgrade your vCenter and ESXi hosts to 6.5a as describe in the KB 2148841

It seems there was a pretty good reasons for VMware holding out on NSX so long since they introduced a lot of great new features with just a fews standouts listed below:

  • NSX kernel modules now independent of ESXi version: This enhancement helps reduce the chance of host upgrades failing due to incorrect kernel module versions since every ESXi upgrade in an NSX environment required at least 2 reboots.
  • Rebootless upgrade and uninstall on hosts: On vSphere 6.0 and later, once you have upgraded to NSX 6.3.0, any subsequent NSX VIB changes will not require a reboot. Instead hosts must enter maintenance mode to complete the VIB change.
  • NSX 6.3.0 also checks for NSX readiness before taking a host out of maintenance mode
  • Controller Disconnected Operation (CDO) mode: A new feature called Controller Disconnected Operation (CDO) mode has been introduced. This mode ensures that data plane connectivity is unaffected when hosts lose connectivity with the controller.
  • Compliance features for FIPS, Common Criteria and ICSA.
  • Improved Layer 2 VPN performance: Performance for Layer 2 VPN has been improved. This allows a single Edge appliance to support up to 1.5 Gb/s throughput, which is an improvement from the previous 750 Mb/s.

  • Linux support for Guest Introspection
  • Better interoperability between vCloud Director 8.20 and NSX 6.3.0 helps service providers offer advanced networking and security services to their tenants. vCD 8.20 with NSX 6.3.0 exposes native NSX capabilities supporting multiple tenants and tenant self-service.  (Very interested to test this and hopefully have a write up in upcoming weeks)


Links:

http://pubs.vmware.com/Release_Notes/en/nsx/6.3.0/releasenotes_nsx_vsphere_630.html

https://kb.vmware.com/kb/2148841

http://pubs.vmware.com/Release_Notes/en/vsphere/65/vsphere-vcenter-server-650a-release-notes.html


vCenter Server 6.5 announcement and detailed new features list

VMware finally pulled the curtains on their new vSphere 6.5 products during the European VMworld 2016 in Barcelona.  No release dates were announced but there are a lot of good stuff here.

  • vCenter 6.5
  • SRM 6.5
  • vRops 6.3
  • vRA 7.2
  • vSAN 6.5
  • VVOLS 2.0

I was fortunate enough to be part of the vCenter 6.5 beta and was impressed with the new features and VMware’s renewed focus on their core application stack.  I also have a couple of JFJ (JumpForJoy) moments which I listed below.

  • Auto-deploy finally got a UI and is now available for configuration in the vSphere Web client.
    • Creation of image profiles
    • Creation and activation of deploy rules
    • Management of deploy rules with ability to check compliance and remediation.
    • Ability to manually match non-deployed ESXi hosts to rules.
  • Enhancements to host profiles
    • Ability to search for a specific setting name, property name, or value by filtering the host profile tree while editing the host profile.
    • Copying setting from one host profile to another profile
    • Mark host profile settings as favorite and filter based on favorites.
  • Current Web client UI and usability improvements
    • Performance improvements
    • Keyboard shortcuts
    • Keyboard support in dialogs, Wizards and Confirmations
    • Recent objects global pane
    • Related objects tab replaced with object category tabs
    • Object details title bar displays the selected object’s icon and name, action icons, and the Actions menu
  • Live refresh, yes live!  JFJ moment!  This feature is awesome and not sure why it it took this long to make this available especially since we now have to use HTML5.   The real time updates are also done across users who are logged into vSphere client at the same time.
    • Live Tasks, Trigger alarms and reset alarms.
    • Navigation tree updates
    • Custom attributes
  • Oh yes and then there is the HTML5 web client.
    • HTML5 (<vcenter>/ui) and vSphere web client (<vcenter>/vsphere-client) are both available.
    • HTML5 web client does not yet have feature parity with vSphere web client and hopefully this will happen soon, but I recommend using the HTML5 as much as possible.
  • New and updated HA features.  JFJ moments all over the place!
    • Enhancements in the way calculations and configuration is done to determine failover capacity within a cluster.
    • Cluster Resource Percentage will be the default admission control moving forward.  The default failover capacity percentage will automatically be re-calculated based on the number of hosts in the cluster
    • Admission control – “VM Resource Reduction Event Threshold” setting
      • In past versions if a cluster did not have enough failover capacity during a hardware failure event, a number of VM’s would not be allowed to restart onto other healthy hosts. This new settings is a new feature that allows admins to specify the amount of resource reduction they are willing to tolerate in the cluster, potentially allowing additional VMs to be restarted even though capacity is not present, in exchange for potential performance degradation of VMs.
      • Setting this value to 0% means that you will not allow any resource reduction of any VM resources in your environment in the event of hardware failure.
    • Configuring orchestrator restarts!
      • Allow admins to specify the order of VM restarts as well as VM dependencies (critical applications, multi-tiered applications, and infrastructure services) at the cluster level.  We finally have similar orchestrated failover capabilities as SRM except SRM allows for injections of scripts which is not availabe with HA.
        • VM restart priority now includes: Lowest, Low, Medium, High, Highest
        • VM dependency restart conditions:
          • Resource allocated – Once resources for a VM are set aside on the host, HA will move to the next VM.
          • Powered On – Occurs when the power-on command is sent to the VM. Does not wait for the VM’s guest OS to be running.
          • Guest Heartbeats detected – Requires VMware Tools. Once vSphere sees that the VMware Tools agent is running, it will proceed.
          • App Heartbeats detected –  Requires scripting with the VMware Tools SDK, however this setting allows for information of a process/application within the VM’s guest OS to be passed shared to notify when an application is up and running in the VM.
  • Enhancements in event logging
    • Improve over 30 existing events for more detailed auditing.
    • Over 20 new events for different inventory operations.
    • Syslog / RELP streams
  • Storage IO Control (SIOC) with Storage policy-based management
    • SIOC was previously enabled per datastore and VM thresholds was set within the VM settings by first configuring the disk share value and then setting the IOPS limit value for each disk .   This was cumbersome to manage.
    • SIOC is now management and configured by using SPBM.
    • For storage policies there are now new rules available for readOPS, writeOPS, readLatency, writeLatency.
  • vCenter Server appliance Backup and Restore capability
    • File based backups/restore of vCenter server appliance through the Appliance Management UI.
    • Backup to a single folder all vCenter server core configuration, inventory and historical data.
    • Backup protocols available are FTP, SFTP, FTPS, HTTP, HTTPS
    • Encryption available for backup data before it is transferred.
    • Optional vCenter data available for backup:  Stats, Events, Alarms, Tasks.
    • To restore you have to use the vCenter installer which will deploy a new vCenter server appliance and restore the backup.  You cannot restore to your existing vCenter server. Make sure your existing vCenter server appliance is powered down before running a restore.
  • Command line deployment of vCenter server appliance
    • Scripted install
    • Installation using JSON formatted template and vcsa-cli-installer
  • vCSA and PSC failover. JFJ moment!
    • I will probably create a separate blog on this topic.
    • Native option to protect a vCenter server deployment from failures in hardware, vCenter and PSC service failures.
  • New Appliance management UI
    • Shows basic health with health badges.
    • CPU and Memory graphs showing utilization trends
    • Backup appliance
    • Create support bundle
    • Perform power operations such as rebooting and shutting down the appliance
  • Migration from a Windows vCenter server 5.5 to vCenter Appliance 6.0U
  • Security enhancements
    • VM level disk encryption.
    • Encrypted vMotion capabilities
    • Secure boot model


Please share your thoughts if you feel I am missing any other important features.

Links:

https://blogs.vmware.com/vsphere/2016/10/introducing-vsphere-6-5.html

http://blogs.vmware.com/vsphere/2016/10/whats-new-in-vsphere-6-5-vcenter-server.html

http://blogs.vmware.com/vsphere/2016/10/whats-new-in-vsphere-6-5-security.html

http://blogs.vmware.com/vsphere/2016/10/whats-new-in-vsphere-6-5-host-resource-management-and-operations.html

WinSCP connection to VCSA failed: "Received too large SFTP packet. Max supported packet size is 1024000 B"

The following error might appear when you try to connect with WinSCP to your VCSA.

This is due to login scripts that are printing words and the first 4 characters cast into the number(represents the first 4 bytes read from the server)

To fix the problem you can usually move the command that print the login script text to another proper interactive script or just remove completed, however in VMware the scenario is different and the default shell has change from bash to appliancesh.

VMware’s resolution is to use the SCP file protocol through bash shell.  However after I change to SCP I received the following error: (when default shell not set to bash)


This was fixed after changing the default shell.  I am using a newly created user account that can be used to access the server through WinSCP.  Just remember you would have to modify permissions on your files to copy them if going down this route.  You can use root account to temporary change the shell from bash to appliance to access with WinSCP. Entirely up to you.

>shell.set –enabled True
>shell
>useradd winscp
>passwd winscp
>visudo (add user with root access)
>chsh -s /bin/bash winscp

If you are using root you temporary change to bash shell and then return to appliance shell:
To return:
>chsh -s /bin/appliancesh useraccount

Links:

https://kb.vmware.com/selfservice/microsites/search.do?language=en_US&cmd=displayKC&externalId=2107727

https://kb.vmware.com/selfservice/microsites/search.do?language=en_US&cmd=displayKC&externalId=2115983

https://winscp.net/eng/docs/message_large_packet