VSAN – cache disk unavailable when creating disk group on Dell

I ran into an issue at customer where the SSD which is to be used as the cache disk on the VSAN disk group was showing up as regular HDD.  However when I reviewed the storage device the disk is visible and is marked as flash…weird.  So what is going on here.

As I found out this due to a flash device being used with a controller that does not support JBOD.

To fix this I had to create a RAID 0 virtual disk for the SSD.  If you have a Dell controller this means you have to set the mode to RAID but make sure that all your regular HDDs to be used in the disk group is set to non-raid!  Once host is back online you have to go and mark the SSD drive as flash.  This is the little “F” icon in the disk devices.

This environment was configured with all the necessary VSAN prerequisites for Dell in place, you can review this on the following blog post:
http://virtualrealization.blogspot.com/2016/07/vsan-and-dell-poweredge-servers.html

Steps to setup RAID-0 on SSD through lifecycle controller:

  1. Lifecycle Controller
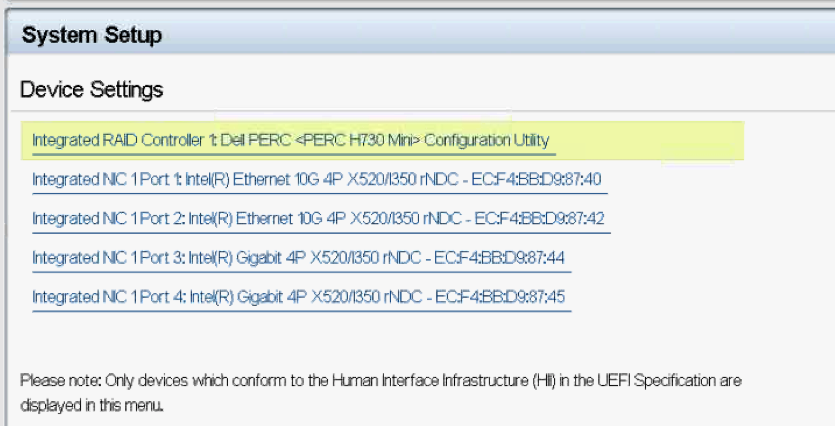
  2. System Setup
  3. Advanced hardware configuration
  4. device settings
  5. Select controller (PERC)
  6. Physical disk management
  7. Select SSD
  8. From drop down select “convert to Raid capable”
  9. Go back to home screen
  10. Select hardware configuration
  11. Configuration wizard
  12. Select RAID configuration
  13. Select controller
  14. Select Disk to convert from HBA to RAID (if required)
  15. Select RAID-0
  16. Select Physical disks (SSD in this case)
  17. Select Disk attribute and name Virtual Disk.
  18. Finish
  19. Reboot
After ESXi host is online again then you have to change the Disk to flash. This is due to RAID abstracting away most of the physical device characteristics and the media type as well.

  • Select ESXi host 
  • Manage -> Storage -> Storage adapters
  • Select vmhba0 from PERC controller
  • Select the SSD disk
  • Click on the “F” icon above.

VSAN – Changing Dell Controller from RAID to HBA mode

So had to recently make some changes for customer to set the PERC controller to HBA (non-raid), since previously it was configured with RAID mode and all disks was in RAID 0 virtual disks.  Each disk group consists of 5 disks with 1 x SSD and 4 x HDD.

I cannot overstate this but make sure you have all the firmware and drivers up to date which is provided in the HCL.

Here are some prerequisites for moving from RAID to HBA mode:  I am not going to get into details for performing these tasks.

  • All virtual disks must be removed or deleted.
  • Hot spare disks must be removed or re-purposed.
  • All foreign configurations must be cleared or removed.
  • All physical disks in a failed state, must be removed.
  • Any local security key associated with SEDs must be deleted.

I followed these steps:

  1. Put host into maintenance mode with full data migration. Have to select full data migration since we will be deleting the disk group.
    1. This process can be monitored in RVC using command vsan.resync_dashboard ~cluster
  2. Delete the VSAN disk group on the host in maintenance.
  3. Use the virtual console on iDRAC and select boot next time into lifecycle controller
  4. Reboot the host
  5. From LifeCycle Controller main menu
  6. System Setup
  7. Advanced hardware configuration
  8. Device Settings
  9. Select controller card
  10. Select Controller management
  11. Scroll down and select Advanced controller management
  12. Set Disk Cache for Non-RAID to Disable
  13. Set Non RAID Disk Mode to Enabled

VSAN upgrade – Dell Poweredge servers

I have been meaning to write up on a VSAN upgrade on a Dell R730xd’s with PERC H730 which I recently completed at a customer.  This is not going to be lengthy discussion on this topic but primarily want to provide some information on tasks I had to perform for upgrade to VSAN 6.2

  1. The VSAN on-disk metadata upgrade is equivalent to doing a SAN array firmware upgrade and therefore requires a good backup and recovery strategy to be in place before you proceed.
  2. Migrate VM’s off of host.
  3. Place host into maintenance mode.
    1. You want to use whatever the quickest method is to update the firmware, for VSAN’s sake. Normally Dell FTP update if network available to configure.
    2. When you put a host into maintenance mode and choose the option to “ensure accessibility”, it doesn’t migrate all the components off but just enough so that the policies will be in violation.  A timer starts when you power it off, and if the host isn’t back in the VSAN cluster after 60 minutes, it begins to rebuild that host’s data elsewhere in the cluster  If you know it will take longer than 60min or where possible select full data migration.
    3. You can view the resync using the RVC command “vsan.resync_dashboard “
  1. Change advanced settings required for PERC H730
    1. https://kb.vmware.com/selfservice/microsites/search.do?language=en_US&cmd=displayKC&externalId=2144936
    2. esxcfg-advcfg -s 100000 /LSOM/diskIoTimeout
    3. esxcfg-advcfg -s 4 /LSOM/diskIoRetryFactor
  2. Upgrade the lsi_mr3 driver. VUM is easy!
  3. Login to DRAC and perform firmware upgrade:
  4. Upgrade Backplane expander (BP13G+EXP 0:1)
    1. Firmware version 1.09 ->  3.03
  5. Upgrade DRAC H730 version
      1. 25.3.0.0016 ->  25.4.0.0017
  1. Login to lifecycle controller and set/verify BIOS configuration settings for controller
    1. https://elgwhoppo.com/2015/08/27/how-to-configure-perc-h730-raid-cards-for-vmware-vsan/
    2. Disk cache for non-raid = disabled
    3. Bios mode = pause on errors
    4. Controller mode = HBA (non-raid)
  2. After all hosts upgraded, verify VSAN cluster functionality and other prerequisites:
    1. Verify no stranded objects on VSAN datastores by running python script on each host.
    2. Verify persistent log storage for VSAN trace files.
    3. Verify advanced settings still set from task 3!
  3. Place each host into maintenance mode again.
  4. Upgrade ESXi host to 6.0U2.
  5. Upgrade the on-disk format to V3.
    1. This task runs for a very long time and has alot of sub-steps which takes place in the background.  It also migrates the data off of each disk group to recreate as V3 .  This has not impact on the VMs.
    2. This process is repeated for all disk groups.
  6. Verify all disk groups upgrade to V3.
  7. Completed

Ran into some serious trouble and had a resync task that ran for over a week due to a VSAN 6.0 KB 2141386 which appears on  heavy utilization storage utilization.  Only way to fix this was to put host into maintenance mode with full data migration, destroy and recreate the disk group.

Also ALWAYS check the VMware HCL to make sure your firmware is compatible. I can never say this enough since it is super important.

This particular VSAN 6.0 was running with outdated firmware for both backplane and PERC H730. Also found that controller was set to RAID for disks in stead of non-raid (passthrough or HBA mode).

Links:

VMware as a kick@ass KB on best practices for Dell PERC H730 for VSAN implementation. Link  provide below.

https://kb.vmware.com/selfservice/microsites/search.do?language=en_US&cmd=displayKC&externalId=2109665

https://kb.vmware.com/selfservice/microsites/search.do?language=en_US&cmd=displayKC&externalId=2144614

https://kb.vmware.com/selfservice/microsites/search.do?language=en_US&cmd=displayKC&externalId=2144936


https://kb.vmware.com/selfservice/microsites/search.do?language=en_US&cmd=displayKC&externalId=2141386

Dell rack servers – Upgrade firmware using Dell repository manager

I had to recently perform some firmware upgrades for customer on their Dell R710 and R730xd servers.  As you all know there are multiple ways to successfully upgrade the firmware and I want to touch on the upgrade through bootable virtual cd, optical cd or USB since this was the only method available to me at the time.

Firmware upgrade methods available:
  • Upgrade using bootable linux iso
  • Upgrade using server update utility(SSU) iso/folder with Dell lifecycle controller
  • Upgrade using Dell FTP Site with lifecycle controller
All of these methods have some great information out there on Dell website as well as blogs but I wanted to just go through my steps using bootable linux iso and primarily how to create it that ISO.
My preferred method is using the Dell FTP site with the lifecycle controller but this not always possible especially if you have trunked ports and have to specify a VLAN (in later iDRAC firmware it is now possible to specify a VLAN!)
The reason why the FTP site method is better in my opinion is because the firmware comparison is done upfront and only the necessary firmware is downloaded for component that are outdate. This decrease the firmware upgrade process considerably compared to the bootable iso that compares everything single component.(this only when you use the bundle, which I do in most instance since who wants to go manually through every single component and check which is required for your server:) 
Steps:
Firstly we need to create an ISO and this done using Dell repository manager.
Open dell repository manager (Data center version) , business client version for desktops

View job queues for plugins install and select each to perform confirmation needed and click accept! (only required after first install)
Create new repository

Select name

Select Dell online catalog

Select brand – poweredge rack
Select Linux

Select your Poweredge server

Click Next
Click Finish
Click Close

Check the box for bundle and select Create deployment tools (Other option is to select the components tab and select each individual component manually but this requires that you know exact which components you have installed on all your Dell servers)

Option 1:
Select Create server update utility (SUU) -> SUU to ISO, but remember to use this iso you have to mount this ISO through iDRAC virtual console as virtual CD, boot into lifecycle controller and select firmware upgrade specifying the CD
Option 2:
Select Create bootable ISO

Make your necessary selection and click Next

Select folders

Click Next
Click Ok
Review job queue for progress on file being created

Dell DRAC and Internet Explorer 11

I don’t think i have ever had more problems that i have had with my IE browser and Dell DRAC interface 🙂
Seems that there is always something broken and can either never get logged in, or show me the turning circle of death or just a blank white screen.
I am still a big IE browser user, yes yes I know, mainly due to compatibility but I think it is getting worse with newer versions and the whole implementation of their compatibility view is just crazy. 
Already downgraded from IE 11 back to IE 10, hence why i am writing this email since for the life of me I could not get the DELL DRACs to work. Alas I am back on IE 11 and have this working..
Problems:
If you cannot login and you know you typing the correct username and password:
Delete your internet browser history, trust me for some reason this works.
If you see blank white screen:
Add the site address to trusted site and check your activeX settings in IE
Add site address to the compatibility view list in IE
If you see the turning circle of death as I call it:
Make sure that server address as added to your Java control panel.
Open control panel
Select security tab
Set security level to appropriate level
Add the site address at bottom to exception site list to allow running after security prompts.
IF you still get stuck my final recommendation would be the following:
  • Upgrade your DRAC to latest firmware version
  • In IE 11 press F12 to bring up the debug bar.  
    • Scroll down to Networks button and select
    • Click on the “Always refresh from server” button (3rd from left).